Did you know that you can share any of your Zimbra items? You can share:
- Email folders
- Address books
- Calendars
- Task lists
- Briefcase folders
Why is this helpful? Here are some examples.
- If you are collaborating on documents with others, you can all work on the same documents from a shared briefcase folder.
- If someone else administers your calendar for you, you can share the calendar with him or her.
- If you have a working team that all need access to a set of emails, you can share the mail folder, and everyone included in the share can read the emails, respond to them, etc.
There are two ways to create shares in Zimbra:
- Right-click the item you want to share, and select Share Folder, as shown here.
- Click the Preferences tab, and click Sharing.
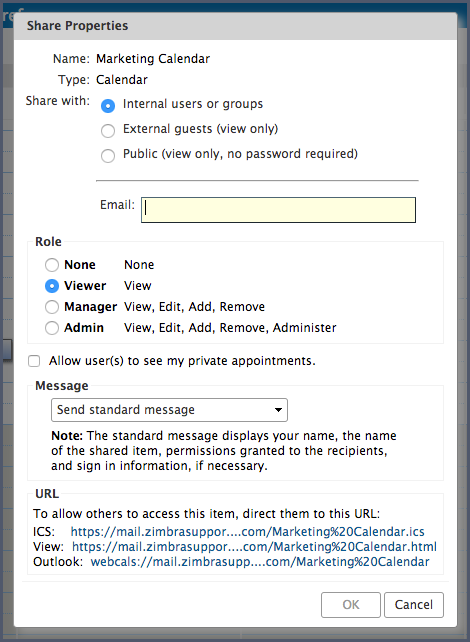
Using either method, you will see the Share Properties dialog box.
To create the share, click here for a demonstration, or follow these steps:
- Select a “Share with” option:
- “Internal users or groups” are those within your organization.
- “External guests” are those outside your organization, and they must have a password to access the shared item.
- “Public” is also for those outside your organization; however, they do not need a password.
- Enter the email address(es) for the share.
- Select the role:
- None is not commonly used.
- Viewer is view-only access.
- Manager allows the user to view, edit, add, and remove from the shared item.
- Admin allows the user to do all of the above and add/remove/change shares to the shared item.
- Click OK.
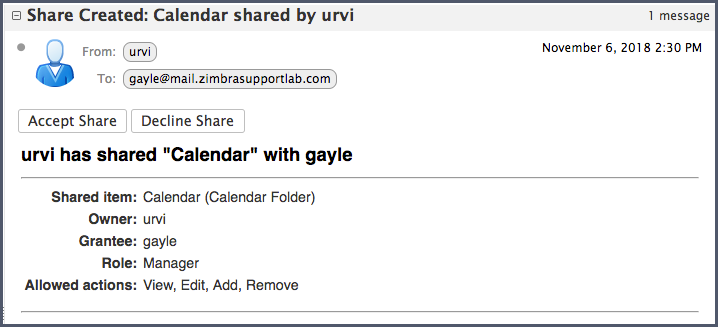
The recipient receives an email as shown here. Ann can click either Accept Share, and she will be prompted to name the folder and choose a color, or Decline Share.
The email also contains a description of the share.
Thanks for joining us for Power Tip Tuesday!
Your Zimbra Friends & Colleagues


Comments are closed.