
One of
the most advanced, and useful features of Zimbra Collaboration Suite (Zimbra),
is its search feature. It is also possibly one of the most over looked. With all
of the toolbars available for the browser, this is one tool that you’re gonna want to use. In this PowerTip, we will discuss how to find any message/document/contact, with just a couple of terms. This is part of a series of PowerTips that we call, “The Power of Search”. You can also get some info on what’s in store for our next release.
*Note- This PowerTip is only applicable to users who use the Zimbra Web Client & Zimbra
Desktop.

User PowerTip #1: May 1,
2007
Zimbra Forums – Zimbra wiki –
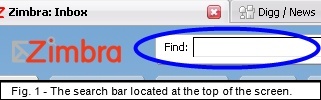 At the top center of
the Zimbra Web Client and Zimbra Desktop is a long search bar. Although you can use standard search terms like “sales” and “Apple”, you can also enter certain commands that will change the way you search.
Unless otherwise specified, Zimbra will automatically search the current section you’re in. For example, if you are in your address book, Zimbra will search your address book.
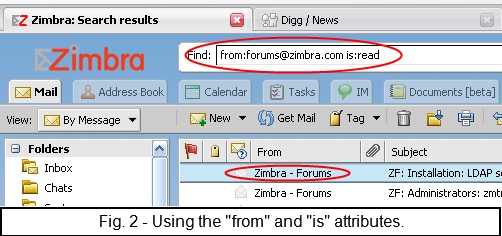
All commands follow the syntax of “command:attribute or location“. For example, is:unread would bring up any unread messages.
You can use many different combinations of the attributes. In the case of Fig. 2, I have used the “from” and “is” attributes. Notice how Zimbra automatically filters down the messages.
In 5.0, we will introduce the “is:solo” attribute. Using this new attribute, you will be able to filter down messages to which you haven’t
replied.
The most common attribute commands are:
| to: <name or e-mail address> Example- to:forums@zimbra.com |
from:<name or e-mail address> Example- from:forums@zimbra.com |
| cc: <name or e-mail address> Example- cc:forums@zimbra.com |
subject:<all or part of a subject line> Example- subject:sales |
|
has:<“attachment”, “phone”, or “url”> |
attachment:<specific attachment type> Example- attachment:word |
| is:<unread”, “read”, “flagged”, “unflagged”, “sent”, “draft”, “received”, “replied”, “unreplied”, “forwarded”, “unforwarded”, “anywhere”, “local”, “sent”> Example- is:draft |
size:<## “b”, “kb”, “mb”> Example- size:12kb or larger:12kb or smaller:12kb |
| tag:<name of specific tag> |
The location attribute tells Zimbra where to look for the message(s).
Many users have different folders where they store their messages. Some even have filters set up so that messages can be directly filed into a specified folder. With Gigabytes of messages and attachments, filing messages is a must.
But even then, sometimes, you can’t find a message.
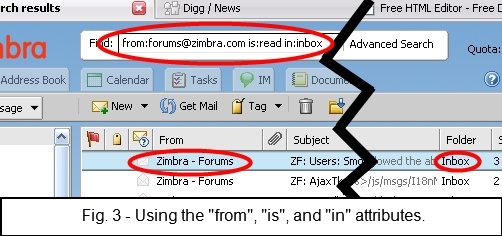
(Ignore the big black line. We had to “splice” two images together)
The “is” command also
applies to this section. For example, in 5.0 we will be introducing shared folders. If you use “is:remote”, Zimbra will display the messages in a folder that has been shared with you. You can also use the “is:anywhere” command to show messages anywhere.
The “in” command is for specifying the location of messages. For example, if you keep a folder only with business information named “biz stuff”, and you know the message you wish to find is located in this folder, you can specify “in:biz stuff“. This will only search the “biz stuff” folder.
In the Fig. 3 example, we have searched the inbox.
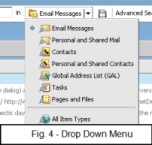
Simply select the dropdown menu at the end of the search bar.
Fig. 4 shows us the drop down menu. Please note that some of these menu options are not yet available, and may change prior to release.
Sometimes, you don’t know the sender’s name. . .or anything else. All you can remember, is that pesky “@aol.com”
If you type:
from:(@aol.com)
This will tell Zimbra to bring up every message from AOL.com.
It works the same with to: & cc:
You can also set the default search in your options.
For example, some of us here at Zimbra have their default search set as: “to:(my name) is:solo” which will bring up any
unreplied-to message. Of course, the “solo” term is in 5.0, but it gives you a good idea on how you can customize it.
We will have several future PowerTips on the options section, including the default search.
The possible search combinations are endless!
We have written a whole section on Search Bar Commands. You can find this in our wiki:
http://wiki.zimbra.com/index.php?title=Search_Tips
We are very interested in your comments, both positive and negative.
If you have a question, suggestion, or request for a Zimbra PowerTip Article, please post it in our forums or add a comment on this post.
If you wish to use e-mail, you may do so at feedback@zimbra.com
Want to get these tips in your e-mail box? Subscribe to our blog on the top right, by entering your e-mail address.
ID:ZPT1-bl-usr-pos1
Bonjour,
Very usefull !
Merci.
How to make a recusive search ? I’ll look after that question in your wiki…
The answer is
under: